My Favorite Books

Wednesday, August 31, 2016

And the fun continues!


Back to playing from last Wednesday....I wanted to make another line/circle stamp using sticky back foam and corrugatted cardboard.  For the life of me, I couldn't figure out how I made my last one!  I forgot to look on my blog as I try to document everything I make!  HA  I'm sure it's out there!!


Anyway, this was one stamp I made.


 I wanted  to make another stamp but I wasn't sure what design I wanted.  I started to go through some paperwork and found a few pages from a Notan design I made at our art group about 10 years ago!


No, I didn't make a stamp from this!!  HA  But it did bring back memories!


Anyway,  I found a few pieces of sticky back foam already cut out from another Notan design.


I don't know what we were doing that night with our designs or the foam!   I cut out some circles and played with the left over pieces and came up with this!
 First, I stamped in my journal book.  I keep a page of all my stamps I make.  I already have a page stamped with the first one I showed in this post so I didn't make another one in the journal...just sayin!


I liked  the design so I grabbed the first piece of fabric I had in my downstairs stash (it's old pieces of overdyed or dyed fabric I don't use!) and started to stamp away!


I just grabbed the first paint from my box...but you know, this turned out pretty good!  Might make a nice snap bag or two or three!  It's a fat quarter but I should get a few bags out of it!


I had a piece of tissue paper that I was using for my Gelatos so I stamped both of the new stamps on it.  Should be fun to put in a book or some type of collage!

Next up I decided to do some mono printing since I had all this red paint sitting on my glass!  Soooooo....I used a credit card to scrap away the paint and to draw or scrap the lines.


I need to take a pic of the whole piece...but the left side was made by placing the painted glass ontop of the fabric. For the right side, I laid the fabric on top of the glass.  Hmmmmmmmm

I usually use a plastic scrapbook folder to do my mono print on.  Then I place that on  top of my fabric.  With the glass laying on the fabric (left side pic above),you sure get a lot of that paint off on to your fabric.
Both piece look good and I'm sure I can use them somewhere....until then...who knows.  I'm sure I have more fun things to do!  I'll just have to stop and think what I want to do next!  HA


Monday, August 29, 2016

More fun!

This was my table on Wednesday!  Yes, Wednesday was a busy day!  Or play day!! So much fun!!!

 You can see at the bottom left my fabric piece I played with (previous post).  Next, I wanted to play with paper using the Gelatos.


 I started off using Gelatos  as  a rubbing on paper.  This paper was very thin, between tissue or tracing paper.  I found it in my journal book. along with some alcohol prints I made with Peggy last year.   This piece of paper had some type of rust on it...don't remember how that go there. Anyway, the Gelato's worked well!


Next I just rubbed the Gelato stick on watercolor paper.  This is a small  journal book I used to keep track of the stamps or lino/rubber stamps I make.

Once the edges had the Gelato on, I just wet a wide brush and spread the color around.  Looks quite nice and blends easily.  I used 3 different inks for this one.

For this page, I sprayed the paper first, then I spread the Gelato stick around the edges and in the centers.  Then I took another paint brush and spread the ink.

When you spray your paper first, your results are more like watercolor.  Again, I think the page looks nice.

I understand you can also apply Gelatos to stamps.  You just apply the color to your stamps, then stamp your paper or fabric.


I really like using the Gelatos pigment stick! They are similar to oil pastels but no smell, you don't need to let sit for 24-48 hours and no peeling of the skin that forms when you don't use the buggers.  I think they are well worth the $$'s and actually aren't all that expensive.  Again, comparing them to oil pastels....so, next time I'm going to play with some of my stamps using the Gelatos!  Is this fair to have all this fun!!!!


Saturday, August 27, 2016

Playtime!

Yep, Wednesday was a big play day for me.  I posted my table runner progress in my last post.  Today I'm showing some of the results I had using Gelatos!


I started off finishing up my embroidery flower from Beth.  This was how I left it the other day.  Not very exciting...


And this is how I finished it today.

I really like using the Gelatos...they go on so smooth and you can add water with a brush or your fingers.  I also used some of my Neo crayons in some areas.

I'm not good at 'floral' painting so I pulled out my Claudia Nice watercolor books to help me....as I really need help!  HA

Then I decided to add some grass!  I know...why didn't I leave well enough alone...but I really don't think it's that bad.  I'll sandwich  and add free motion stitching for the grass and add some nice blue threads in different values to fill in the sky.  I mixed Gelatos and Inktense blocks for the grass, as these 2 products work so well together.

That's how I spent some of my time on  Wednesday!!!  It was so much fun!!!  And yes, I played some more using Gelatos, Inktense Blocks and Crayons, so another post is coming!  I just have too much fun!!!


Thursday, August 25, 2016

Table Runner update!

On Wednesday, I met my bud, Carol, for breakfast then headed home to play!  I started off trying something different on my table runner!  I recently mentioned Hilary B., who is a wonderful textile artist from the UK.  The last few weeks, Hilary finished  some unique pieces for their textile exhibit, which were completed with thread sketching, as Hilary referred to it!   Hilary has some wonderful video's on YouTube that you need to check out!
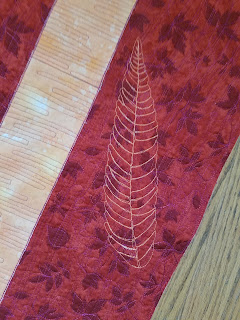
This is the piece where I added a center strip, which gave it some color but I wanted something different on our table runner so this is what I did on Wednesday!  With inspiration from Hilary, I decided to use her technique and add some leaves to my table runner.I   know they are hard to see but look at the bottom left and top right!  Leaves via thread sketching!

So this was how I did the leaves!  I started off tracing a leaf shape (actually several of them!) onto tracing paper.


This was a leaf from the book FALL: Photographs that I purchased several years ago. I traced the leaf onto a piece of tracing paper.


 I love the book and have used tracings of the leaves as patterns (this quilt has several of the leafs that I used for applique).


Next up I pinned the tracing to the table runner and started to stitch along the lines.  Free motion is the best for this type of stitching.  I used a 12wt heavier thread to stitch with.  Hilary used or uses black thread for her collage pieces, which are spectacular!  I wanted a contrast so I used orange to blend with my center strip.


It wasn't  hard to remove the tracing paper.   I ripped the outside edges first, as the paper gets perforated easily, hence, removing the remaining pieces is quite easy.


I just used my little tweezers and small forceps (from Harbour Freight!) to remove all the other remaining pieces. Easy to pull off!!


And this was the results and I'm quite happy with it so far.  I may add some smaller leaves but I need to reduce them to the size I want.  The book, FALL, has huge photographs, 9" x 11".


This was really fun and I think added to the piece.  It's just for Bob and I so no big deal!

After I sewed the leaves, I headed downstairs to do some playing with my Gelatos and making some new stamps!  I have so much fun alone!  HA  Will be posting those results later this week!!!


Tuesday, August 23, 2016

New Products

Not sure how many of you know Hilary B!   Hilary is from the UK and creates amazing work so make sure you check out her blog or her FB page.  I also love how she shares her work via video's.  A few of those video's Hilary was using products I've used before as well as one I had not heard of.  Well, of course, I had to order from Dick Blick (they had the best price I found) and Sunday I played with them!


My first purchase was  Neocolor Artists crayons.  I 've used these at a workshop I attended several years ago and honestly forgot about them.   These are nice and work well direct on the fabric or brushing on water for a watercolor effect.


Next purchase was Gelatos, pigment sticks (I ordered the pastels).  These are so cool!!   I honestly had not heard about them before....living in a cave you know!  HA  This is the exact set I ordered.  I like the pastel shades

These are really nice...again, you can rub directly on fabric or use water to blend.  And they blend quite nicely on the fabric too.


And a pic of my Inktense blocks. I bought these last winter in Florida and they are fun to play with.  Really work well with stencils and you can add water to your fabric before or after (to blend).


One of my art friends in Florida, Beth, gave several of us gals this stitched flower so we could play with our Inktense blocks.


I use all three products to color Beth's stitched flower.     I started to use a little square (left side) to document each  product and how they looked with water or alone, which I will keep.  But once I got started I just mixed all the products together!!  And they each work well with one another.  That's a good thing!!

We'll see where this piece goes.  I need to do some highlights/shading/etc. to make the flowers look more like flowers!!  I don't want Beth to think I messed up her nice 'gift' to us!   Fun products and I just might use the blocks on my table topper I posted about last time!  Hard to leave well enough alone isn't it!

Sunday, August 21, 2016

Table Runner

I started working on a new table runner for our dining room, per hubby's request.  I mentioned in a previous post that I was going to applique some huge leaves of ice dyed fabric on this piece of commercial fabric.  Not a very exciting piece.....so I knew it needed something.

Well, I changed my mind about the leaves and I'm headed in this direction now.  I start off free motion stitching around the leaf shapes.


Then I got this great idea one night in bed that I would stitch wavy/straight lines on top of the free motion stitching!

I like the look and really would have been happy with just adding some binding!  Well, I finished all the stitching last week and today decided to add a strip of gold/orange...can't decide what color it really is but it looks good.

Then I added some free motion stitching across the center strip....I may even add some additional color.  Got some new products that I'll post about later that I may have to try out!!


And this is where I'm at so far!  I may add some other pieces like circles or triangles or just finish it off. as is.  Let's face it...this is only for our dining room...fall is coming and the colors will work just fine.  Nothing exciting...like I don't have anything else to work on, right!  HA HA HA


We've had some rain on and off past few days, which we really need.  Of course, Gigi isn't so fond of wet grass so that can be a struggle...takes a lot of time for her to finally decide where to go potty!  At least she'll hold it and not pee inside...she is really good about that.   But some days I would prefer not to stand outside for 15 to get her to 'go'!  Geezzzz   Temps are still in the 80's.  I don't want winter to get here but I sure would prefer temps in the 70's or even 60's for the rest of the next few months......

Friday, August 19, 2016

Purge Time And It Feels So Good!

Yep!  It's time to purge!  My dye room in the lower level is a wonderful room for dyeing fabric, painting and generally just making a mess!  BUT....at times it does get a little disorganized and those who know me know I can't work in a room that is disorganized!  So, Thursday I decided to start another cleanup and with that came 1 1/2 bags of trash!
This was the before pics!   This is my table that I work on and lately has been one of those 'flat surfaces' where all the 'junk' gets placed!  Really, I haven't done any dyeing or painting on this table since last fall.  


And after!  Bob's work 'shop' is behind my table.  He build a half wall that separates our areas. 


That blanket/area under the table is for the dogs.  They like to lay there while I work.  The floor is cement as this is in the basement area and is very colorful in places!!  So is the sink!  But that's why it's called a dye room!!  There is a walkout door directly to the left of my table so easy in and out for taking projects outside.

These are the cabinets for my art work.  The first one on the left is for holding all my containers.  

The next 2 cabinets are for storing my paints/dyes/stamps, yada, yada!  Yes, I have a lot of stuff!  

Before...not bad but lots of stuff I don't use or need anymore.  


And cabinets after....this one now just has my stamps, screens, stencils, etc.  


I really didn't have to do a lot of purging in this cabinet but I did get rid of quite a few containers or old textile paints.  I see one of my shelves is a little tipsy!  Might have to remember to fix that in the morning!


This is a smaller cabinet (no before pic) that holds phemera, tissue paper, nuts and bolts (rusty of course and some new ones too!), just a lot of items you never know if I'll need!

I am really fortunate to have a room like this to work in and to make a mess in! And if I'm in the middle of doing painting or dyeing or stamping, I can leave the mess and shut the door.  Our family room is before this 'work' area and we have 2 doors that close this room off from the family room. 
This pic is coming down the stairs to the family room.

This pic was taken from my dye room doorway into the family room.  

This pic was taken standing by the end of the pool table.  See, you would never know this mess lurks behind the doorway!   HA  The sun is shining in from one of the sliding doors.  
So that was how I spent several! hours yesterday.  After a shower, Bob and I headed off to Menard's then to dinner at Applebee's.  Nice to know I can now work again.  I have a table runner I'm working on that I want to do some painting or stamping on.  Time to make a mess!!

Tuesday, August 16, 2016

How about a slice?

A few days ago I did a post on the 12"x12" exchange I've particapted in with Tommy and others.  Before Tommy started doing the 12"x12" exchange(s), she would coordinate with  10-16 of us a group 'slice' quilt.

Our first one was in 2011 called To Market.  We were each given a photo that Tommy had printed out in the size we needed to create.  There were 16 of us! participating and Tommy also provided  batting and backing.
This was my completed section.  
Why, yes!  That is bead for the little knob on the mellon!!!  I also printed out the little sign on the right top side onto fabric then stitched in the quilt. 

And this is the full quilt.  Amazingly each section just fit!  And Tommy did a great job putting it all together!

In 2012, Tommy once again was 'game' to put together another slice project!  This time there were only 10 of us.  This slice quilt was called A Street in Ireland and we were accepted at the Houston IQA show that year!  Woohoo!   We didn't win but as they say, it was an honor just to be accepted!


Once again, the slices just fit so well!  This time Tommy kept each piece as a separate panel so we could each have our piece returned after the IQA show.

This is a picture of my quilted section on the left and the picture I worked from on the right.  Below are some detail pics.


Really fun to work on...yes, a little nerve racking just because you are passing on your work to someone else!!  But I would do again!


In fact, back in 2008, our Aussome Fiber Group created Underwater Fantasy which was a color study done by six of us.  We did a random draw on selecting a color from the color wheel.  We could only use that color/shade along with black or white.  Mine is the blue colorway and it was tough to work only in one color!  But we were juried into Houston that year as well. Double woohoo!  

I

This was my section....and a detail pic of the turtles.  I printed out pictures of turtles then painted and used a dimensional paint to get a rough shell feel and look!  


Not sure if you can see the sign in the picture above...bottom right side corner...it says 'equestrian zone'....for the sea horses!  Clever, I know!  HA


So if you are looking for a challenge for you and some buds...do think about doing a slice project  I have some documentation for guidelines I would be happy to share...not a big deal but you do need some guidelines.  It's a great way to create something special.  


The first slice quilt we did, because all the pieces were sewn together,  Tommy just put all the names in a bowl and drew out one name.  She has the quilt...lucky Gayle!  

The 2nd quilt and our UnderWater Fantasy we were each given our piece back.  You just don't sew all the sections together.  Works out well!..Give it a go!