My Favorite Books

Showing posts with label mono printing. Show all posts

Saturday, June 19, 2021

What to do with all those painted papers?

 I've had lots of folks ask what I would do with all the papers I've been painting, stamping, etc. in  Hilary's MIP online class.  Well, I have shown several pieces that I've collaged, stitched/quilted and added binding.  Some other ideas Hilary has shared with us is to look at our work as 'paintings' and mount them vs finishing them off as quilts.  So I've been playing with that idea!  

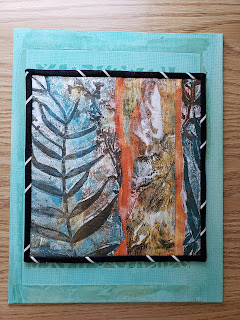
I finished this small quilt not that long ago (12"x12" paper collage) and decided to attach it to an old painted canvas panel I had.  Nothing fancy but it was fun to just play with another technique!  


Now that I'm on that 'kick' I headed to JoAnn's and picked up some wrapped canvas as well as well as two 11" x 14" photo frame panels for $2 each!  


Back in 2019 we were  printing with leaves, painting, you name it!  So I had lots of papers to  quilt.   I just quilt them and cut them out to insert in photo cards to mail to friends.  The quilted piece slips into the photo frame as shown in this picture.  


This was a piece that I quilted this past weekend and I laid one of the photo frames on top of it and I liked it!

Sorta!  You'll see later in this post!


  Closeup of some quilting.


I posted on our MIP FaceBook page that because the frame was white I asked for a suggestion as to what color I should paint the background. 

Gina, one of the lady's in our group had this suggestion:
Maybe you could make marks on the white canvas with similar colours to the leaves but slightly lighter? Stitcherly marks? Or (I'm on a roll now!)cover some leaves in paint and print lightly onto the background?


So, that's what I did!  Off I went to cut  some Hosta leaves from the backyard.  Then I mixed up some paint...I couldn't remember what colors I used originally so this was trial and error!  Next was to mono print around the white frame!   I just painted the leaves and used my brayer to transfer the paint. 

I'm quite happy with the results!  Thanks, Gina for the suggestion!!!

I'm in the process of making another painted mirror frame.  I'm giving this one to my daughter since I'm using another one of her great hand painted pieces!


Friday, February 19, 2021

Mono Printing Layering - part 1


I wanted to work on printing papers to insert into photo frame cards .   So, I'm breaking this mono printing layering into two posts.  This post shows some that I'm not crazy about but I'm sure if I don't use them 'as is' I'll end up adding more layers!  These are all printed on papers (layout, watercolor, tissue and deli).

These are prints on deli paper (12"x12")...the one on the right isn't that bad and I'm sure can add another stencil or ghost print to enhance it.


This is also on deli paper and will work good as a background or add more to it.  The colors are nice...again, this was just picking up what was left on the gelli plate.


This is a large piece of tissue paper...well, it was just handy.  I started to use it to 'mop' up stencils and when I didn't want to mess up a clean sheet to clean the gelli plate.


Oh, the layers on this layout sheet of paper!  This layout paper is over 20+"...the piece on the right side isn't too bad..and if you slice the other print into cards, it too might not be that bad.


OK, this is just ugly....the left side is a print from a coloring sheet!  You can barely see the leaf shape!  HA


Again, once these are cut into 4"x6" they might not look that bad.  The one on the right needs a dark stencil on it.  These were printed on watercolor paper, which I thought was too heavy to absorb a good print.  Lesson learned...


Actually, these aren't that bad....they might really make a nice card insert.  This is a sheet of layout paper.

Fun times, right!  My next post will show some mono printing layers that turned out so much better.  


Monday, February 15, 2021

Finished Collage


 I finally finished a small, paper collage piece I was working on this past winter.  I'm happy with how it turned out and will sit it on one of the end tables either in LR, computer room or where ever there's an empty space!  HA


I didn't do a lot of free motion quilting....seemed strange to do any sewing since I haven't done any quilting in months!!!


Fortunately, I have more than enough threads of every color!!!


Yes, I am hung up on using black and white for bindings.  That's due to my bud, Mary, who does so many great quilt piece of art work.  She uses b/w often in her work and she's also to blame for me cutting up old quilts for other uses!  HA  Mary cuts up her quilts all the time!

This piece is all paper (with exception of binding) and measures 10"x10".


I have a post on more mono printing coming later this week but showing more layering techniques.  Some are duds and some turned out great.  My plan is to use these mono prints as inserts for cards that I send out to friends.  


I used this type of card for inserting Valentines several years ago.  This picture shows my fiber Valentine inserts from 2019.  I got this idea from Mary Ann Van Soest!  Thanks, Mary Ann!)  I think using some of my  printed papers will fill the insert and hopefully look nice to receive.  Not sure if I'll do any stitching on the papers or not.  Time will tell!

Tuesday, January 26, 2021

Boring I know - More Mono Printing!


 Yep...more mono printing!  A gal has to keep busy, right!  And I haven't decided on my next knitting project yet, so...I have to play, right! 

This is the piece I showed in my last mono print blog post. 


I've added a strip at the top and started to fill in the the tree trunk the little bird is attached to.  So interesting, very few have noticed the little bird on the bottom!  HA  I found this picture in the Bird and Bloom magazine and thought he would fit!

Now to add stitching...the papers are fused on a piece of batting (12"x12").  


These are some other mono prints I did using layering technique and ghost prints.  I really like how they  each turned out.


For my next collage I used the print above (on the left) and part of the print, on the right, in this picture.


The orange strip(s) are from some older papers I've printed last summer or maybe the summer before!  HA


I'm happy with how this one turned out.  Again, I need to think about stitching or whatever!  This one is 9"x10", again, fused on a piece of batting.


Today we're enjoying some time inside...what a unique idea!  HA  Snow started around 5 a.m. and we've received about 2 inches...it should taper off by afternoon so we'll just enjoy the beauty of a Michigan winter from inside our house! 


Friday, January 22, 2021

More Mono Printing


Still playing around with more mono prints.  I like the black printed piece I stenciled last summer and looking at it closer noticed some pale blue throughout. 

So...it didn't seem like enough blue so I overdyed with some Robin Egg Blue dye by just painting the liquid dye on the cloth.  I wanted to use this piece as a background for a new collage I started to work on but I just couldn't get it to work out...too busy of a piece but I still like it and I will use it somewhere.   

But check out the Botanical stem stencil that I printed in the middle.  It's a stencil by Mary Beth Shaw and I really love it.  It's 9"x12" and a perfect size.


This was a ghost print on deli paper after I printed some layers using the gelli plate.


The prints on the sides were from using up any paint on my gelli plate.


Sorry...forgot to turn the picture...birds of course!  HA  

I used the original mono print of the Botanical Stem above to be the focal point for this  collage.  You can see where I used some of the bird stencil prints and ghost prints as well.

I added a picture from my Birds & Bloom magazine to the bottom right.  He just seemed to fit.  

I still need to blend some of the hard edges as well as extend or outline the stems.  The print is brighter than what's showing in the picture...you can see the 'real' color in the first picture on this post.  Hopefully, when it's finished it will look deeper when I photograph it! 

Instead of putting this collage on a canvas (because I didn't have any!) I just fused to some batting.  I'll be machine and hand stitching so this works better for me.  Too hard for me to stitch through canvas.  Now on to the next collage.  

Tuesday, January 19, 2021

Some Mono Printing


 These are some of my mono prints from this week using the Gelli plate.  I had some papers previously printed that I wanted something on the backs of them.  Good way to play and practice.  I just used any acrylic paint or Set-a-color opaque paint to print with.

This was a ghost print from the one below that I ended up adding some painted bubble wrap and paint.


The first print was for the feathers outline..then I painted over a ghost print from another print!  You can see what it looked like in the second pic below before I added the blue print.


This was a ghost print from the print below.


A before print (see 2nd pic above for the finished pics).  I downloaded some out of order and too lazy to reload!  :)


Nothing great...just some bubble wrap and smearing from leftover plate on the gelli plate.


Had to use up the pink paint!


I love working with feathers on the gelli plate!


I took the wet feathers from the print above and laid on top of the white feathers...putting them a little off center of each feather.


  The first print with the feathers 


And, again, took the feathers and laid on top of the papers and printed.


The feather ones turned out really nice!  These are all 8"x10"


Just playing with leftover paints and feathers!  Fun hour or two and the backs of my papers have some cool designs printed on them.  


Sunday, July 14, 2019

Mono printing with paints!

Last week we were still playing with mono printing...this this time we are using paints.  Because I'm conscious of spending $$'s - of forget that...I'm just cheap and have all these acrylic 99 cent paints to use up...so that's what my mono printing was done with!  I'm quite happy with the results...but first, this is how we decided on what to print on our medium.

Hilary had us pick out some pictures that we either liked the color or shapes in the photos.  I happened to have in my "Hilary" folder, some old pictures from an old calendar.  These are the two I used as my inspiration for printing.  I loved the colors....


This was the first mono print I did.  We used a palette knife to apply our paints  You can see how thick the paint is...I actually got two prints from this attempt - pics which follow.  I tried not to apply it as thick when doing the rest of the mono prints.


Here are the before and after prints, after meaning I applied dye to color in the white areas..  These will most likely be used as background pieces or some will be perfect for stitching.


These two are on fabric.  All the rest are on paper.


And have to add a great grand baby picture...this is Boscoe with Rilynn!!  How sweet is this!