My Favorite Books

Showing posts with label paper collage. Show all posts

Saturday, March 5, 2022

101 Daily Art Project - day 16 - 19

 Using the papers/photo transfer from my 'playing' earlier this week I finished some collages!  I have to say it's been great getting back into the swing of things.  Next week, I'm back working on my disperse dyed quilt top.  


I merged pics of the pieces I printed.

I only used the left side of this pic.  Each section is 5" x 8" gelli printing.


I decided it's SO much easier to create a collage using papers from the same printing session!  The colors blend so much better!!!  And saves me from digging through mounds of papers I've printed over the past several years!
 
 This collage is day 16.  The leaves are from a stencil I printed on layout paper but the background was bland.  The circles from the gelli print filled in the bland areas.  


Day 17


Day 18


Day 19 - this was using both papers and the photo transfer fabric with music printed on and over printed with gelli printing.


Next week it's back to working on the disperse dyed quilt top with one more leaf embroidery piece to do...then to decide what other hand embroidery work and/or free motion quilting to do...decisions..decisions...

Thursday, March 3, 2022

101 Daily Art Project continues!

 Still doing the 101 daily art project...I am really glad I signed up for it.  You don't have to spend hours on a project....just 20 minutes or however long you have.  The other day I decided, since I'm working on the disperse dyed quilt one week and some type of other media the next week, that I would do some gelli printing.  Turned out to be fun again!  I forgot how much I enjoyed playing with the gelli print...and of course I had tons of previous stamped/dyed/stenciled papers that needed additional work on them!  How perfect to use them up!

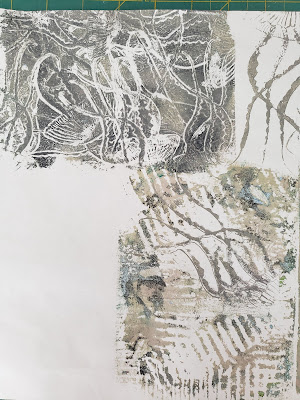
This was what I printed using the gelli pad.  I got some cool pieces and some not so exciting...but I did  use up some of those 'not so exciting' pieces from two years ago in a few collages!  I'll post those when I finish up this week.


This was sheet of music that I printed on one of those photo transfer fabric sheets.  Actually, I printed several of them years ago for another exhibit our art group was working on.  I never did use them!  So perfect for playing around with printing over the music with the gelli print! 


This really isn't as gray as it looks in the picture...I was using green/turquoise/gold paints.


I don't remember what the original background  layout paper looked like before I printed over it!


This was a dark green small piece that I gelli printed with a circle stamp...actually, the stamp is a coaster!  But works better as a stamp!


This was just a plain white piece of layout paper that I printed over using some of Hilary's wood stamps I purchased.  It's a jelly fish!  I have two different sizes of the stamp and use it frequently...well, I used to use it when I was printing more papers!


My next post I'll show some of the collages I'm trying to do daily.  They are only 5"x8" so easy to complete pretty quick!  


Saturday, July 24, 2021

Paper String Art Progress

 I was suppose to go watch our grandson play Lacrosse in a town about 10 miles from us BUT my back is so bad today!!!  I can hardly stand up or walk today! I AM so disappointed  because the games are so close!!!!  Darrin just sent a text that Nick got 2 goals and another text that their team did win.  They have two more games, one at 3 and one at 5 today and may play tomorrow if they keep winning!!  Hope I can make that game!!!

 My back has 'issues' (2 LS surgeries) but as long as I keep walking and exercise I can usually keep the pain at bay.  But wouldn't you know today it would act up!!!  It hurt when I went to bed last night but was REALLY bad this a.m.  I could hardly get out of bed and when I did it just kept getting worse!  UGH...ice and heat and Advil!  So, off to my sewing room to sit in my lumbar chair and sew! Or I should say off to the sewing room the girls and I went!  This was Kalee and I had to keep moving her tail so I could sew!  They have a large dog bed next to my machine but she loves laying behind my machine!  Go figure!


I had ordered more Madeira Lana threads for the string art piece and they arrived yesterday!  Good timing!  


I ordered a Hyacinth color which is perfect for the background.  So that's what I focused on today. 

 I'm about 50% finished with the background and I'm anxious to do some additional stitching on the flowers with a Sky Blue Lana thread.  I originally used Sulky 12wt for the inside of the flowers but I like the texture of the Lana thread so much better.  You can definitely see the difference in the texture.  The dark color is the Hyacinth and the sulky blue thread on the flower areas.


You can see how much of the background I have stitched today.  A ways to go but that's ok...I have this project as well as I've been working on the hand stitching rail fence quilt top...and knitting!  Nice I can pick and choose!  HA


Here's what the front looks like so far....  


Now I have to figure out where I am going to put all these paper stitched pieces or collages I've made.  I'm thinking of getting a large, large journal or else put them together in their own, so called paper book.  Similar to what I did years ago for my Art Diary...you can see a few of the pages on this post here.  Not sure I have any wall space left in our house or my sewing room!  HA

Saturday, July 17, 2021

Another paper collage in progress


11" x 14" paper


 I showed this paper string art piece on my last post.  Friday I decided to start to 'work' on it.  This was how the piece looked when I first created the string art on paper, which is the flower image.  Then I added some soy wax and dyes.  You can see how I created this piece on this post.


I liked the colors but they needed to be brighter.  So what to do but get out the Gelato crayons (by Faber-Castell).   Hilary uses them in quite a bit in her work and has shown us how easy it is to enhance your art work or painted or dyed papers easily with these crayons.  

See the difference!  It's so much brighter and a big difference.  I even used a pale blue/gray to enhance the flower/petals before I added the purple/blue crayon.


Next up, using Judy's suggestion on needle size for sewing with Lana threads, I played with stitching on a small painted piece.  It's hard to see but I used both a light gray and copper Lana thread.  

The light gray gave me some issues until I started to loosen up the top tension.  Same with the burnt orange thread.  I did find I couldn't do free motion quilting.  I'm thinking I need to move a lot slower if stitching with the heavier thread(s).  


So I sandwiched some batting and started stitching!


This is a closeup of how far I got..not very...had errands to run but I'm pleased. 

Actually, I didn't have any Lana thread in the color I need for the blue area but I had a Sulky #12 wt thread and used that instead.  I also kept the #16 topstitch needle in.  Worked great!  

So guess that means I need to order more thread!  The blue appears to be more on the periwinkle shade of blue/purple.  Always need an excuse to order threads, fabric or crayons, right!

Saturday, June 19, 2021

What to do with all those painted papers?

 I've had lots of folks ask what I would do with all the papers I've been painting, stamping, etc. in  Hilary's MIP online class.  Well, I have shown several pieces that I've collaged, stitched/quilted and added binding.  Some other ideas Hilary has shared with us is to look at our work as 'paintings' and mount them vs finishing them off as quilts.  So I've been playing with that idea!  

I finished this small quilt not that long ago (12"x12" paper collage) and decided to attach it to an old painted canvas panel I had.  Nothing fancy but it was fun to just play with another technique!  


Now that I'm on that 'kick' I headed to JoAnn's and picked up some wrapped canvas as well as well as two 11" x 14" photo frame panels for $2 each!  


Back in 2019 we were  printing with leaves, painting, you name it!  So I had lots of papers to  quilt.   I just quilt them and cut them out to insert in photo cards to mail to friends.  The quilted piece slips into the photo frame as shown in this picture.  


This was a piece that I quilted this past weekend and I laid one of the photo frames on top of it and I liked it!

Sorta!  You'll see later in this post!


  Closeup of some quilting.


I posted on our MIP FaceBook page that because the frame was white I asked for a suggestion as to what color I should paint the background. 

Gina, one of the lady's in our group had this suggestion:
Maybe you could make marks on the white canvas with similar colours to the leaves but slightly lighter? Stitcherly marks? Or (I'm on a roll now!)cover some leaves in paint and print lightly onto the background?


So, that's what I did!  Off I went to cut  some Hosta leaves from the backyard.  Then I mixed up some paint...I couldn't remember what colors I used originally so this was trial and error!  Next was to mono print around the white frame!   I just painted the leaves and used my brayer to transfer the paint. 

I'm quite happy with the results!  Thanks, Gina for the suggestion!!!

I'm in the process of making another painted mirror frame.  I'm giving this one to my daughter since I'm using another one of her great hand painted pieces!


Monday, February 15, 2021

Finished Collage


 I finally finished a small, paper collage piece I was working on this past winter.  I'm happy with how it turned out and will sit it on one of the end tables either in LR, computer room or where ever there's an empty space!  HA


I didn't do a lot of free motion quilting....seemed strange to do any sewing since I haven't done any quilting in months!!!


Fortunately, I have more than enough threads of every color!!!


Yes, I am hung up on using black and white for bindings.  That's due to my bud, Mary, who does so many great quilt piece of art work.  She uses b/w often in her work and she's also to blame for me cutting up old quilts for other uses!  HA  Mary cuts up her quilts all the time!

This piece is all paper (with exception of binding) and measures 10"x10".


I have a post on more mono printing coming later this week but showing more layering techniques.  Some are duds and some turned out great.  My plan is to use these mono prints as inserts for cards that I send out to friends.  


I used this type of card for inserting Valentines several years ago.  This picture shows my fiber Valentine inserts from 2019.  I got this idea from Mary Ann Van Soest!  Thanks, Mary Ann!)  I think using some of my  printed papers will fill the insert and hopefully look nice to receive.  Not sure if I'll do any stitching on the papers or not.  Time will tell!

Thursday, July 30, 2020

Stitched Paper Collage 2


And she had an idea...yep, that gets me on a tangent from time to time...so I had an idea to create a background using one of my stencils...but first I had to decide on which color of printed paper to use. 


I settled for this deep lime green piece for the stencil and the brown stamped piece for the background. 


I stamped this with the arch stamp I made a few weeks back. 


Again, this was just an effort in trying to create something from an 'idea'.  I just traced the abstract leaf stencil on to the paper (I had fusible web on the back of the green paper).  Then I carved out each piece.


Stencil pattern all cut out!


I fused the stencil cut on to my background piece.


It's a little hard to see but this was actually my inspiration for making this stitched collage.  I used the same stencil on this poster board then I stamped with a real leaf.
9" x 12" paper collage


Funny, but I forgot I had used a real leaf so I was digging in my stamp 'tub' and couldn't find the large leaf!  Well, duh!  So I just used a small leaf stamp I had.


I fused the entire piece onto some batting and then free motion quilted the leafs. 


First cut around 5" x 12"


Then I got another 'idea'...I didn't really care for the piece as a whole so I'm playing with the camera and slicing the piece to create a diptych!


This is the first so called 'cut' I did via photo program.


around 4" x 9"


And the second piece cut.
Now to get the nerve to slice them!  But I'm liking the smaller versions.  This is practice for the 'idea'...you can see some of the lines I traced...just because I used a pen to trace and my cutting isn't the best! 

Now to the next phase!  Whatever that will be!


Tuesday, July 28, 2020

Stitched Collage


My inspiration piece...combination of a greeting card and photo from a magazine on wall art.


I totally changed my paper collage from my last post!  I didn't like the blue veins but at the time it was a good effort to play with the design.  So back to the drawing board!


I liked the orange leaf but then started playing with some other papers I had printed.  This was a piece of fabric I tried for background.


I did audition different backgrounds and decided I liked this deli paper that I stenciled.  So I fused it down on a piece of batting and started to lay out different papers.


Still playing with papers and layout.


I liked this piece better before I quilted the background.  I don't use variegated threads often but decided to do just that...why?  Heck, if I know!


So this was what/how I ended up!  I'm not happy with the background quilting...but this piece isn't going anywhere other than in my sewing room with my other pieces from Hilary's online class.


10.5" x 12.5" paper collage

So on to the next collage!  Have an idea but they usually don't turn out or get me in trouble!  Guess we'll see!