My Favorite Books

Showing posts with label gelli plate prints. Show all posts

Thursday, January 30, 2025

Gelli Prints What Are They Good For!


 In my last post I showed the Christmas cards I'm making using Strathmore Photo Cards.  I wanted to show some other ways you can make your own cards.  

In 2023 I made some cyano printed watercolor sheets, which I cut up and inserted in these cards.  I still will send these out just as a 'hello' card to friends.


Gelli prints or painted poster board are also great for cutting up and inserting into the photo frame to make a card. 

You can purchase the photo frame cards online...guess where!  HA  Yep, on Amazon!  Where else.  


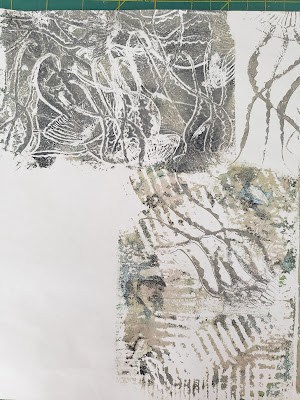
I showed in the last week or so, some gelli prints I made.  These (the 3 at top of the page) are perfect to cut out and also insert in the photo frame.  Just a nice way to send a special card to a friend or even to just an acquaintance. 


Also, Lisbeth Degn has some video's on using your printed/gelli prints.  She has a cool way of folding the papers to make a book!  So that's what I'm doing.  I have lots of printed/gelli papers I made in Hilary's online class.  I'm excited to have them all in one spot vs in a bin!


You can see the papers are all together!  It's a cool way to keep these beauties together!  

And that's what you can do with your Gelli or printed papers!

Monday, January 20, 2025

Gelli Print Time

 Yep, it's Gelli Print time again in the house!  I've been watching some video's by Lisbeth Degan on YouTube.  She is a Mixed Media and Textile artist from Denmark!  WOW...check out some of her work on Instagram here  and on her youtube channel.  

I've been so inspired this new year with all of the wonderful artists out there.  Hard to decide what to do next!  So, I have about 4 or 5 projects that I am working on or starting!!!  First up is playing with my gelli printing again.  I only made six 8"x10" and eight 3"x5" prints.  


Hard to see but I used a heavy piece of brown paper squished up and tapped on the painted gelli print.  You have to enlarge the picture to see the pattern.  Lisbeth was using some used foil pretzel or coffee bags that she cleaned out then heat with heat gun.  She got some cool prints.  I just used some paper scrunched up.


The one on the left doesn't seem like much but the center will be good for collage work.  

And the smaller ones will work good for cards.


The print on the right was my paper to wipe off my roller with.  This print had too much white on it so what else to do but use leftover paint and roll on top.
The left one was using two colors and the scrunched up papers.

I already made a card to mail from one of the smaller prints.  Hence, there are only 3 small prints left.  

I like the larger print too.  Again, enlarge to see the detail.  I think it reminds me of pictures of icicles!  

"So what are you doing with these, Robbie" you're asking yourself.  Stay tuned.  They're going into a journal I'm making.  

And I'm also working on Lisbeth's Stitched Circle Weekly Challenge.  More on that later this week!

Saturday, March 5, 2022

101 Daily Art Project - day 16 - 19

 Using the papers/photo transfer from my 'playing' earlier this week I finished some collages!  I have to say it's been great getting back into the swing of things.  Next week, I'm back working on my disperse dyed quilt top.  


I merged pics of the pieces I printed.

I only used the left side of this pic.  Each section is 5" x 8" gelli printing.


I decided it's SO much easier to create a collage using papers from the same printing session!  The colors blend so much better!!!  And saves me from digging through mounds of papers I've printed over the past several years!
 
 This collage is day 16.  The leaves are from a stencil I printed on layout paper but the background was bland.  The circles from the gelli print filled in the bland areas.  


Day 17


Day 18


Day 19 - this was using both papers and the photo transfer fabric with music printed on and over printed with gelli printing.


Next week it's back to working on the disperse dyed quilt top with one more leaf embroidery piece to do...then to decide what other hand embroidery work and/or free motion quilting to do...decisions..decisions...

Thursday, March 3, 2022

101 Daily Art Project continues!

 Still doing the 101 daily art project...I am really glad I signed up for it.  You don't have to spend hours on a project....just 20 minutes or however long you have.  The other day I decided, since I'm working on the disperse dyed quilt one week and some type of other media the next week, that I would do some gelli printing.  Turned out to be fun again!  I forgot how much I enjoyed playing with the gelli print...and of course I had tons of previous stamped/dyed/stenciled papers that needed additional work on them!  How perfect to use them up!

This was what I printed using the gelli pad.  I got some cool pieces and some not so exciting...but I did  use up some of those 'not so exciting' pieces from two years ago in a few collages!  I'll post those when I finish up this week.


This was sheet of music that I printed on one of those photo transfer fabric sheets.  Actually, I printed several of them years ago for another exhibit our art group was working on.  I never did use them!  So perfect for playing around with printing over the music with the gelli print! 


This really isn't as gray as it looks in the picture...I was using green/turquoise/gold paints.


I don't remember what the original background  layout paper looked like before I printed over it!


This was a dark green small piece that I gelli printed with a circle stamp...actually, the stamp is a coaster!  But works better as a stamp!


This was just a plain white piece of layout paper that I printed over using some of Hilary's wood stamps I purchased.  It's a jelly fish!  I have two different sizes of the stamp and use it frequently...well, I used to use it when I was printing more papers!


My next post I'll show some of the collages I'm trying to do daily.  They are only 5"x8" so easy to complete pretty quick!  


Monday, June 10, 2019

Gelli Plate Printing

For the last few weeks, we've been using the Gelli plate to print on our papers.  I did a post where I used one of the Gelli plate papers to make a fiber card (you can see that post here).  So last week we were at it again using the Gelli plate and masks.  I'm just showing my papers after they were over dyed.  I started to cut the papers up to make a collage and I couldn't see which paper went with which over dyed paper!  HA  So here are my results....I really enjoyed this method.


I'll be showing what I'm making with some of the pieces I cut out of my masked gelli prints!  What fun!!!

Saturday, June 1, 2019

Paper Fiber Card


Last week I worked on making more gelli prints and was so excited to get some great results.  So I decided to use one of my pretty pieces and make a fiber card for one of my friends.  I really like the colors in this print and the areas were almost a perfect 5"x7" section for cutting out!


So I cut out one of the sections and layered it on some batting and did some free motion work.


I've changed to a different paper for printing and I'm really happy with the weight of the paper and how easily it did stitch.  Plus, I'm using Hilary's wax medium, which I really like vs other mediums.

After I finished the stitching, I attached to some heavy weight Pellon for stability.  Next I created the backing/address using  Solvy iron on interfacing that I colored with pastels then brushed with water.  I iron the top of the Solvy interfacing (just the top inch or so) onto a piece of printer paper and feed through the printer.  Works for me!  Label all done!

Next I edged the card.......

And the finished card!

I'm happy with how the card turned out.  I love the colors and I hope my friend, Sue, enjoys it as well.   Now to my next project...we're making little books in our online class with all our Gelli print papers.

Monday, May 27, 2019

Some success...some not!

We're still printing with the Gelli plate in our MIP online class.  So what to do with all these papers you ask!  Well, we're working on making some little books. 


First up was an accordion book, which I did finish.  I used some of my older papers that I printed on  lighter weight paper. 


I have to say at times it hard working with the light papers or deli papers.  They wrinkle, even though I iron before/after printing, before/after dyeing and before/after waxing. 

 I'm now using a heavier weight paper that appears to be perfect and doesn't wrinkle.  We're now working on using heaver weight card stock for our next book.  I finished printing and over dyeing papers this past weekend so hope to get a book made next week.   I'm very happy with some of the papers as they are lighter colors than what I've been making. 


Now on a 'not a success' note!  I was very happy with some of my latest papers so decided I wanted to do a larger collage piece.  We use Heat 'n Bond light on the back of our papers to attach to our base, so I got busy and started to iron  fusible on my papers...WAIT!   Remember you are suppose to iron fusible on the BACK of your paper!  Well, guess what I did...hard to see in this picture but that's fusible on the FRONT of my paper!!!


Well, dang...this was another favorite paper I wanted to use.  I immediately went to our FaceBook page for our MIP group and mentioned what I had done.  Well, to the rescue was Hilary!  She suggested I use the shiny side of the Heat 'n Bond paper and iron several times while lifting up.  Great idea and it did work!  Well, it would have worked totally but I was so excited while I was getting rid of the fusible....I took time out to reply on FB to tell  Hilary her suggestion was working....BUT wait again!!

Because I took the time out to comment,  I forgot to remove a small section of the paper and guess what!  It stuck!  That's ok...Hilary suggested I just over dye the piece again!  HA

Live and learn, right!!!!  Now to the next lesson and project!