My Favorite Books

Thursday, February 27, 2020

Glad this project is finished!


Our little Rilynn!!
Geezz...I'm pretty much a self taught knitter.  Yes, I've taken a few online classes through Blueprint (Sally Melville & Andrea Wong (Portuguese Knitting) but otherwise, I've been  self taught.  Up until this Pinafore (for our great grand daughter,  isn't she a cutie!), my projects have come out great!  Or at least I've been happy with them and wear what I knitted.  But I hit a snag with this project.

I honestly couldn't remember how to pick up and knit stitches using the Portuguese knitting method.  I was lucky enough to have Andrea Wong post a YouTube how to do this simple step.  Honestly, I couldn't even remember how to hold my yarn and needles the 'old' way and kept getting my yarn just not in the right spot with the Portuguese.  But, Andrea did a great job explaining so that took care of  one problem.  And, yes, I felt dumb seeing how easy it was!


Next up, I wasn't very careful on storing the half finished knitted piece...hence, I did get quite a few snags/mini holes, which I tried to repair.  Hoping when I block it, they will fall into place!  I'm sure when Rilynn wears it, she'll create some of her own, which is fine.  It's meant to be worn, right!

Lastly, I couldn't figure out how to pick up the stitches around the armhole, which is one piece...using my circular needles it just wasn't cutting it!  I couldn't make it around the armhole!   I finally reread the instructions, where it said "using double pointed needles, pick up 54 stitches".  Hmmmmmm  OK, so I get out two double pointed needles and tried to pick up stitches....no way was this going to happen.


FINALLY, I read the material list again  and guess what!  They said "set of size #3 double pointed needles"....double pointed!  Really!  I have no idea why but I JUST happen to have a set of double pointed needles (set of 4!)  My next delima was how to use them.  I have never made socks and I don't know why I even had a set of double pointed needles (even in the correct size!) but there they were...so off to google how to use the buggers!

Well, I know for sure I won't ever make socks!  I felt like I had three or even four hands!  Yikes!  This was  not fun and more frustrating.  I don't know the number of times I ripped out picking up stitches around each armhole!  But I finally got into the swing of it!  Separating the 54 stitches to 3 needles!  DUH!


FINISHED!!


But it's done...well, almost.  I need three buttons for the back closure and guess what!  I could only find one pink button, in the right size , in my button box!  All those buttons and only one pink button!!!


To tell the truth, I'm almost tempted to remake this pinafore....almost...I purchased yarn to make a shawl last fall at the same time I purchased the yarn for the pinafore...so I really want to make the shawl - for myself!  Who knows...I'm not big on making children's knitted clothes because they grow out of them so fast.  So guess I'll be selfish and just make my shawl!  And I won't be using double pointed needles!
Tuesday, February 25, 2020

Still sorting papers!


 I've mentioned in previous post(s) how we are sorting  our papers  from Hilary's online class.  Seems pretty easy, right...yep..it is or I guess I'm getting better at sorting.   First sort by color, but then once you've sorted your papers where do you put them!!! 

I had my papers stored in this tote, which is about 3ft long and about 1.5ft wide.  It's pretty deep and so far all my papers fit BUT once I sorted them...then started to work on a project...before I knew it they were all messed up again!!!  Doesn't work for this Type A person.  I like some organization in my life and in my artwork products/medium/etc.!

I was asking in our online group how others were handling this and a few sorted and put into folders, some wrap a sleeve type folder around each sorted section, etc.  I was actually taking a section of newspaper to hold each of my color papers...but I wasn't happy with that either.


While cleaning/sorting my papers and getting my table set up to do more work,  I found these clear plastic/acid free bags -  13"x19"package of 25  (ClearBags Seal Top Closure from Amazon).  When working on my DIL's genealogy book, her mom had several valuable documents (wedding, christening, etc.) from Germany.  They were beautiful but she had them rolled up and I wanted to protect them.  These bags worked great to store her documents in.  They were a perfect size for her documents and guess what!  Perfect size for my papers!!! 

I forgot I even had them  since I stored them  next to my poster board that I lay on my table when working with paints.  I only used 3 of them for the documents and the package contained 25!  So glad I found them!!!!


So now each color section of my papers are in their own sleeve...which makes it so easy to pick up and work with!  Keeps them nice and neat and keeps them sorted!


Hard to see above....but the papers are in bags!  Woo hoo!


Next, we  sort by 'features' - those papers that can stand on their own as a 'whole' piece to stitch or cut out certain items for them to be the 'star' or main focus in a quilt. 


But notice something....yes, they look cool but they need something more, don't they!  By "something more", more definition or overdyeing to color in the white, etc.

So that's also a sort within a sort for our features!  These pieces (along with quite a few others!) will be a separate bag for me to work on.


This oval screen print paper is cool and will make a great piece to use as a whole piece but there's too much white around the edges. 


There's only so much we can do with thread, right!  I may just add thicken dyes around the edges or even Intense block pastels. 


Background pieces are just that..pieces that can be used for a background or cut up to use in a  patchwork  piece or in abstract collage work.  Same with feature pieces that 'need more'....This will make a good background piece or used in patchwork/collage but, again, too much white so it might need some over dyeing or addition of pencils or pastels or whatever!


Same with this piece.  I don't see it being used as a feature piece but it could be cut up in strips or even circles but still needs to be overdyed for sure and who knows what else!


And you all thought I was just playing around in our class!  I sure am learning so much....and now I get to 'play around' some more by trying to figure out what to do with my sorted stack of 'needs more'! 


Stay tuned!  This could be interesting or could be a disaster!  But then I'll just have to stencil/mono print/stamp/dye/etc. more papers!  Guess that's not all bad! 


Saturday, February 22, 2020

Cardinal is finished!

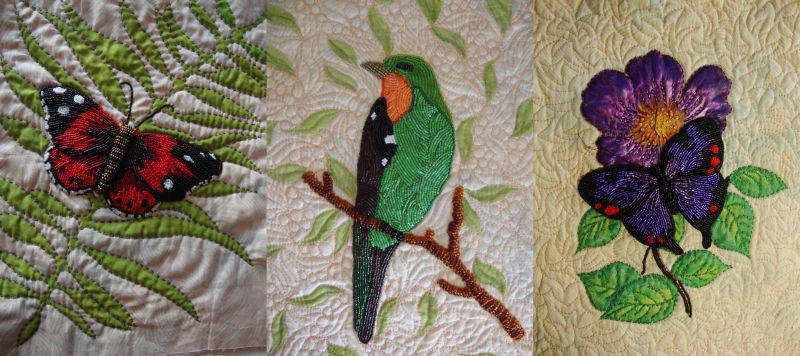
Yep...cardinal is all finished...even the sleeve on the back!  Ready for the exhibit "Birds, Blooms and Butterfly's" in May..or is it April?  Hmmmmm  I forget, but it's done...now to finish the Woodpecker and maybe the other beaded bird that is waiting for a home!  HA

Finished Cardinal

It was fun to work on this cardinal and I'm so glad to have put him in a home of patchwork!  Now onto the woodpecker and the wren, who is waiting for his home!
In progress.....


I started off with some stab stitching then switched to green threads.


I need to add more of the embroidery...


branch and some beading!


Sometimes you don't know when to stop or when to add more...


I finally decided to stop adding more embroidery...
Animation from beginning to end!


Friday, February 14, 2020

Library Quilts


It's always fun to look back at our work, isn't it?  At least it is for me.  There are times when looking at 'older' work I can see where I should have done something different or why the heck did I do that!
I recently picked up all of my older quilts I had hung at our local library.  I thought they needed to be replaced with some newer ones I've made.

I would like to give a shout out to Guy and Angie Adamec for their assistance removing the quilts off the walls and replacing them!  Guy made the hanging system several years ago and originally hung the quilts at that time.  Angie and Guy are always volunteering in our little village!!  Thank you both so much!


Here are two quilts that will be going back to join the 'newer' ones after these are 'refreshed'!  The quilt above I made in 2001 called 'Rhyme or Reason' (theme) was for a quilt guild challenge but it's a good quilt for children to look at!
Now that I look at some of the detail I have to say I'm amazed with all the work I did on this one!!

 Who knew!  I remember some of the elements but I really forgot how much is in this piece!

OK, she's not the prettiest "Mary" but the lamb is really cute!  Not a lot of definition to distinguish the lamb from the background but what did I know 18 yrs ago!


Check out Jack!  He's a handsome young man!  And my clock...I don't remember doing these at all!

I'm sure I was only working on one project at a time in 2001!  Boy have times changed, right!
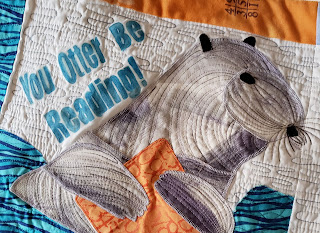
The next one I made specifically for our local library in 2005.  That was our first winter in Florida and the perfect  project.   It took me all winter and some of the spring when we got home.  It was my own design but I used some applique patterns for the animal blocks and found the saying around the borders, which I obtained permission to use from WRC Media/Highsmith, Inc.

Once again, I forgot all the elements in this one!   It was fun to look back at this quilt!   It isn't the best picture but you get the idea  (measures around 48-50").


When I picked up this quilt, I noticed some of the letters, which were photo transferred, had really faded.  So out came my Intense pencils and I colored in the first set of lettering "you otter be reading", which worked great!   I did the same with the next blue letters and again..worked fine.   On this one I just applied a small amount of water on a brush to blend the colors.


 Buds at our art group suggested I use matt medium (my textile medium seemed REALLY runny).   No problem and it colored just fine.  Again, I used blue pencil.


Here is where I started to color in the lettering with Intense pencils.  See how faded the words were.  Which is interesting...not all of the photo transferred lettering faded!  And this quilt was hung in an area where no sunlight hit it.


Before I brushed the color with matt medium.

And all renewed! 


The next lettering "books make me hoppy" didn't work so well!  I used brown Intense pencils and water to blend the color.
You can see how the letter outlining area ran like crazy but only on the BOOKS word...I ended up using some yellow acrylic paint to color around the letters...for some reason the rest of the lettering was fine.  I could feel a wax surface on the photo transfer on the first word but not on the rest.  Go figure....from a distance on the wall you can't tell.


Looks better and no one will notice!


Another block...just happened to have some of this fish/water commercial fabric.  I do remember that fabric.  I had made a baby quilt for one of my friends first child.  Funny, what you remember and what you forget!  HA

I don't know if this dog is suppose to be missing an eye!  Think I'll add one!  I probably just forgot to give him one originally!  HA

Suppose to pick up my new car today!  Woohoo!  Really excited...Bob got a 2020 Enclave, which is what I usually drive.  We always needed a large SUV driving to Florida  but now he needs a large SUV to haul his Radio Controlled airplanes when he goes to the fly field!  HA  Fine with me...I'm getting a really nice 2020 Envision!  I've had 5 Enclave's so it will be nice to have a new vehicle/toy!
Oh...Happy Valentine's Day too!!!  First year I haven't made any fiber cards...making over 50 last year did me in...fun while it lasted but no more!


Monday, February 10, 2020

Aussome Meeting

Well, to see what our small art group is up to head over to our blog!  Grab a cup of coffee as there's lots of pictures and words!  Hope you enjoy!

Thursday, February 6, 2020

Yep, online class is still going strong!


 I've been quiet with the online MIP class with Hilary B lately.  It's not like we aren't doing anything!!!  Class is still on with two videos each Monday!  I'm trying to play catch-up on the videos from the past few weeks.  Sometimes that happens but it's nice that we can watch each lesson when and where we want.  And you can work or not work on a particular lesson!  That's also what's great about any online class!

This module, we're working with all those papers we've made over the last year.  Now for my blog readers who have asked me what I'm going to do with all of those papers, we'll each find out!  Even me!  HA  Although I have created several cards, embroidered books (2), squash books (2) and a few small quiltlets!  So I have used some of my papers!

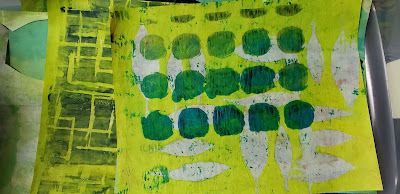
These (left pic)  are some papers that need more work...perhaps, stamping, stenciling, over dyeing...just something to enhance them to use as a background or a feature.


We had to 'sort' our papers (not fabric yet - although I don't have as much fabric as I do papers!).  Our first sort was by 'feature' or 'background' piles!

Feature is just that!  Something that stands on it's own (my description!  HA) or a whole piece you can stitch.  Or sections you'd use that your eye would be draw to first on your work.  Again, my description! 
Backgrounds are just that...something you can use to display your 'feature' pieces with or use in abstract work.
These are some of my browns/yellow...doesn't look like a lot but I really have a lot of papers in each color section!!!


These are some of my feature papers.  I've used several of these already in pieces.  Again, I have quite a few!


I know these groups don't look like many pieces of papers...but trust me!  Each group is loaded with papers!!!  I have groups of backgrounds in blues, greens, yellow, browns, purples, red, etc.!!!!


Some greens for background use...although I did find some 'feature' pieces that could stand on their own!


These are some baggies that I already had sorted by color.  They are just snips and small squares of papers.
Next was sorting by color, values....whew!  This took me a few hours to get my groups of papers in order.  I kept changing my mind!  No surprise there, right!


Next lesson was to create an abstract piece using our papers.  I didn't want to do this on a large piece of paper so I got out my octopus book (you can see pages I started back in the fall  here.  Not sure if it's easier or harder working smaller!  But I did enjoy working on this one piece.  Just my start and some of my 'trying' things out!


This was fun playing with little strips and bits!!!


Finally, I settled on this for my finished abstract.  I'm happy with it!  I hope to work in blue or greens for my next piece. 


You can see the piece in my Octopus journal!  It's only around 8.5" x 6" or close to that with 3 or 4 pages in each section.  I love this journal and they didn't have anymore when I checked on Amazon.  Might have to check again.   


I hope to make a few more  abstract pieces.  I have a journal book that is a a tad larger I started to keep for some of my designs so I might even put some in that book.  Who knows!  I might be too busy watching the videos for this week's lesson!!

Monday, February 3, 2020

Switching gears!


Yes, I do switch between projects...mainly for keeping my wrists from hurting!  Beading uses different muscles/fingers than embroidery and different from knitting!  So I go back and forth and, of course, I always have multiple projects to work on.  I'm still not sure how to incorporate this little beaded bird in a quilt....this quilted piece measures 9"x12".


But I'm making progress on finishing up the beaded cardinal quilt.  I love this process of hand embroidery work!!!  So meditating!


Some straight stab stitching


I'm also playing around with different color/weight of threads to use for the woodpecker's tree!  More to come on that project!!