My Favorite Books

Monday, July 31, 2017

Nursery Rhyme Challenge

First, I need to explain the Nursery Rhyme theme for the online Art Quilters Around the World challenge.  We take turns selecting a theme and this time it was Christine Lee's turn and here is her explanation:
'Nursery Rhyme'
"Illustrate your own amusing reason for an author to have written what he /she did. ie was little jack Horner a naughty boy and was sent into the corner as punishment?  Did another egg push Humpty Dumpty off the wall?"
Christine Lee

Before I show my finished quilt, check out a cartoon I found on FaceBook!  It sure hit Cristine's theme!    Cute, isn't it!  


I've always enjoy Theodor Seuss Geisel's , a.k.a. Dr. Seuss, books...who hasn't!, so I thought I would start researching some of his stories and try to figure out why he wrote some stories/books.    In doing that research, I found out that  Mr. Geisel was asked to write a reading primer for children.  The thought back in 1956-57 was primers (e.g. Dick and Jane primers) were boring and made learning a chore for children.  Who knew!  Not me...I grew up on Dick and Jane....but I digress!!    Mr. Geisel was asked to write a children's book/primer and he was given 250 words that he had to use in his book.  Hence, Mr. Geisel started with the first 2 words, which were...CAT and HAT!  Hence, The Cat in a Hat was born!!!  


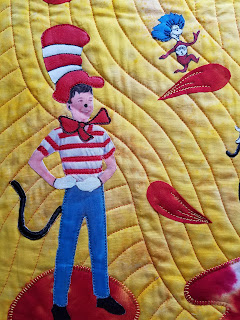
 Here is my "The Cat who Taught Kids to Read"!


So that is where I started.  I transitioned Dick into becoming the CAT......


And poor Jane became Thing 1!


I've had this piece finished for several weeks just because it was so much fun to make!!!  I started off looking up  coloring pages of Dick and Jane as well as different images of the CAT and printed on paper to get some ideas on how to fit them in my quilt.  Here are Dick and Jane printed out on paper!

Of course, I had to draw some hair for Jane (or Thing 1!) and a hat and bow tie for Dick.  Once drawn up on fabric I just painted with textile paint. Then I printed out on fabric colored pics of Dick, CAT and Jane and painted over some areas with textile paint just so they looked a little brighter. 


I quilted the background fabric first then fused all the pieces and used buttonhole stitch (red pieces), straight stitch then free motion quilted all of the other areas.    This was another fun challenge!  Do stop over on the blog to see how the others created their Nursery Rhyme piece!!!

Saturday, July 29, 2017

Getting ready for a birthday!

Nope, not my birthday but our grand daughter, Amber, turns 18 next Wednesday!  18!!!!  I can't believe it!!!  Amber's birthday party with family and friends is today!  Of course, Darrin is smoking his usual wonderful pulled pork and smoked chicken wings.  YUM...

Amber is at that age where it's hard to buy for her and she's quite the shopper or saver I should say.  She's always looking out for the best sale(s).  So, it's cash for her BD...but that's so boring and I'm tired of giving the gift cards...so what to do!  Google!!

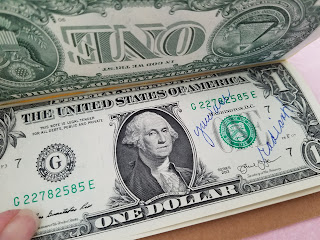
And this is what I came up with!  You make a money pad!  I went to the bank and got 50 brand new one dollar bills.  Then I stopped and picked up a can of Plastic Dip!


Several layers of Plastic Dip are applied to the top of the pad (I used chipboard for front and back to hold the dollars together).    I won't go through step by step, if you're interested you can go to this link and see a video!   I used Bob's vice to hold the pad while applying layers of plastic dip.

And my finished money pad!  I made a cover for it...and the 50 reasons I wrote on each dollar bill!


Amber is a very caring young lady so it was pretty easy to come up with 50 reasons why I love her! e.g., you are beautiful, you are so considerate, you are so caring.....you get the picture!

 She can just remove the dollars one by one!  How cool is that!

Next up I rolled some money around a skewer so it was rolled quite tight.  I place a roll inside a balloon then I blew up the balloon and tied it off!

Can you see the little roll of money!  I put a small piece of scotch  tape to hold it in shape.  There's only four of these!  I think Amber will be happy with her gifts and happier to be able to spend them!

The money pad is all wrapped up and the balloon dollars are tied to the bag!  We're all set for the party!  I'm picking up fresh corn from our local farmer this morning to take for dinner.  We love Weil Sweet Corn and today is their first day for the corn being ready!!  Can't wait!!!!    Good food, fun and family time!  Can't get better than that!

Thursday, July 27, 2017

So many forms of art!

I'm not going to "re-invent the wheel" as they say...so I'm just going to provide a link to Mary Stori's blog post from earlier this week!  

I just finished watching Finding Vivian Maier on Netflix streaming, which is the documentary Mary wrote about.  If you have Netflix, this is such a really interesting show to watch (or perhaps you can find it on DVD at your library? Or elsewhere.)
 You can read Mary's post which spurred me to check it out!  Hope some of you do so as well.  Vivian was quite the artist in photography and quite the character!  You can also check out Vivian's website and see some of her photography.

Thanks again for the recommendation, Mary!!!

Tuesday, July 25, 2017

Old Beading

I'm currently working on creating four 12"x12" squares for Tommy's annual exchange challenge. They aren't due until September but I have another project due that same time frame so.......because I can't show my current project and Mr. Blue hasn't been touched in over a week, I thought I'd share some 8 1/2" x 11" beaded pieces I created for the Bead Journal Project back in 2010.  We had to create a beaded piece monthly....I think I was involved in this project for about 3 years. Hope you enjoy seeing some of my beading from 7 years ago!
January

February


March

April

May

June

July

August

September

October


November

December

Friday, July 21, 2017

Workin Hard or Hardly Workin!

Honestly, Bob and I are "workin" hard!  We usually stain/paint our deck every 2 years or so but this year Bob noticed several of the boards were rotten.  He called to get some estimates on the repair and after hearing the estimate (I should say after he picked himself up off the floor!), he decided he would replace the boards himself.  

As with any project, once you define the problem, decide on the resolution, identify resources/products needed,  prepare your timeline and identify your 'team', heck you're well on your way!  

We all know Bob is very project oriented and I know a job he does will be done well.   He's been working on his excel sheet, measuring, buying lumber and equipment and now we are in the construction business!   I showed this picture in my last post  but it gives you an idea on the size of the deck.  The top level opens from our dining area then you go down about 8 steps to a small level, then more steps down to the yard area.
Add caption


You can see the 2nd level at the bottom of the stairs.  

Bob started this past weekend by tearing off some of the bottom boards that needed to be replaced on the top level. 


 He's cut some boards and stained them but before he replaces them we have to paint the bottom of the spindles....guess whose name was on that 'task'!  Yep!  That's me!  

Actually, we had our house built over 21 years ago and I've always painted the spindles and then helped paint the rest of the deck with Bob.  So no surprise my name was on this task!  

So on Tuesday I painted the entire spindles.  You can see the wood showing where the original boards were just nailed in place.  Deck builders didn't do any of the staining the year we had the deck built.  Bob thought it best we stain the bottom to help prevent more of the wood rotting out and while I'm there I might as well just paint the whole spindle!!!  Yep...that's a project manager for you!  


It really didn't take that long but it sure was hot on the deck!   The flooring looks bad but it's because Bob used the power washer on the deck...we're going to power wash and scrap more of the stain off before we paint the floor.....but we have a long way to go until that job is ready.  Right now Bob needs to cut the boards and replace on the inside of the top deck.  Then he'll do the same on the outside. 

Then we can start on the lower deck area, down the stairs then come back upstairs to the top deck and replace the top boards!!!  Whew...I get tired just thinking about this job!  

It is keeping Bob busy and he's really enjoying see how much money he's saving by doing it himself!!!   But my reward is dinner out so it might not be so cheap for him after all!!!  

Wednesday, July 19, 2017

Time to work outside!

I've been wanting to scrub our fence in the backyard for a few weeks.  It's vinyl and pretty maintenance free but they do get  mildew and just plain yucky dirt on them....so, for 3 hours on Monday that's what I did!  And before you say "why not just power wash it?"   First off, I think that's just a waste of water...you can see our backyard is quite big....this is just the north side..


And to use a power washer is really pumping a lot of water nowhere!  We have stone around the fence so the grass wouldn't even get the excess water.  
Second, even the inside of the slats had quite a bit of mildew and grime, so much better to take a brush/bucket with soap and scrub!  So that's what I did...here are some before and after shots! 


 See how nice and white!!! I brought down my little seat/wagon and once I sprayed some cleaner on the fence, I'd sit my butt down and scrub.  I did wear my brace and rubber gloves, which was an excellent idea!!!  And see how nice and clean!!!
This is the south side of the yard...Only problem, once the inside was done, it was also time to do the outside of the fence!!  Oops...almost forgot about that!  But I did finish the outside too, south and north sides, with exception of the back of the back of the fence! That faces the woods (east side) and no neighbors there...just woods and I don't see it!  Kinda like the back of your hair!  I don't see mine! HA  Bob said he'll do that....someday....the fence..not my hair!

Sunday, July 16, 2017

Honest..I've been busy!

Can't believe my last post was almost a week ago.  I do try to post every 2 days or so.  This is after all my journal!  I print out my posts every year or two (depending on how much of a discount coupon is being offered!) and then I have a hard copy of my life!  Speaking of life....

Yes, I have been busy!!  Mr. Blue is slowly getting his body!  I've started to outline his little feet and then I'll switch between the rest of his body and feet!  Those tiny #15 seed beads get to me so I relax with the larger beads (#10's).

 I altered his picture to black and white and sepia!  Just kinda fun to play and see the light and dark beads!


And I'll have to remember to send a final picture to The Fiber Art Bee group!  I did a lecture/trunk show  (you can see that post here)  back in 2016 and they presented me with LOTS of blue beads!
 I've used so many of the beads they gave me in Mr. Blue!!  This fiber group are wonderful and talk about active!  They always have some interesting workshop taught by members or professional artists.

I've also completed my challenge piece for the online group, Art Quilts Around the World.  Our theme this month is Nursery rhyme and it's due July 31st.  I can't say what my piece is...but here's a sneak peak!   And it's finished!  YEA!!!


And I'm now working on the 4, 12"x12" squares I need to have completed by September for Tommy's exchange this year.  Again, I can't show what I'm doing but trust me...I'm working away!

And on a good note...so far the injection in my wrist is holding up...although, I had a scare last week...I went to shift my body (hip hurts if I sit too long!  ha) and used my right hand to help move my body!  Not a good idea!  Boy, did that hurt!!!  So I  kept my brace on for a good part of a few days and iced it.  So far I'm ok!  Whew!!!!

Bob has been working hard on our deck.  We have lots of boards that, after 21 years!, are finally starting to rot.  We have had estimates but they want so much money it's ridiculous!  So, Mr. Fix-It has his project plan (on Excel!) and has been buying wood, an air compressor (the one we have is too heavy to move around!), a staple/nail gun, paint, etc.


 He's pulled off some of the boards and has painted some new ones.  Monday, I'll start painting the spindles where he removed the boards so that area is painted and hopefully will save from rotting.  Have to give Bob credit...he's taking his time...that was my main concern he would overdo and kill himself...but he's doing a little each day.  So far...so good!!!  And he's still alive!!!

Tuesday, July 11, 2017

Gigi's Gottcha Day!

Yep, today is two years since we adopted our little Gigi!!  She actually looks like a puppy here but the rescue figured she was about 2-3 years old.  So we figure she's around 5 - give or take!

And what she looks like today!  Well, her tongue isn't always out but you get the picture!

 You can read more on Gigi's adoption story here and how wonderful our lives have been since that day two years ago here .

Saturday, July 8, 2017

Roberta Warshaw Art

I follow several...ok, more than several! artists blogs and one that I have followed for quite sometime is Roberta Warshaw.  I so enjoy when I see Roberta has posted another post and a picture or two of her work.  Roberta's artist statement follows:

"For most of my life I have been a painter. I have worked in pen and ink, watercolors, gouache, oils and acrylics. I have always painted the world around me in all its true splendor. For many years I lived in the tropics and painted the lush plant life that surrounded me. When I left the tropics and moved out into the country I painted landscapes of the local farms and my wonderful vegetable garden. Now that I am living part time in the Sonoran desert, I am influenced by the very unique and wonderful looking cactus and flowers I see on my walks."

I love her work because it always looks so delicate to me.  I  save some of her recent pieces from her blog to show here in this post.  I hope if you aren't familiar with Roberta's work you take a 'trip' to her blog and Etsy page (she has a 'shop' link at the top of her blog).  I am hoping she gets back to producing some of her artwork in cards too!  


I think this piece would look wonderful hanging on the wall!!!  Gee, maybe we need to talk Roberta into creating patterns for quilts!  HA  Like she needs another 'job'!  Isn't this piece so delicate!


Even her lino cut artwork is outstanding.  


You can also check out some more of Roberta's collages here.  If nothing else, I know you'll love her work and perhaps be inspired to purchase a piece of art or just be inspired!!